Inspirescroll
Introduction
In an era where digital services are increasingly subscription-based, managing these subscriptions has become a necessary part of our digital lives. Whether it’s a streaming service, a fitness app, or cloud storage, many of us sign up for various subscriptions through our iPhones. However, there may come a time when you want to cancel one or more of these subscriptions. Whether it’s because you’re no longer using the service, or you’re looking to save money, knowing how to cancel subscriptions on your iPhone is essential. This article will guide you through the process of canceling subscriptions on an iPhone, ensuring you can manage your digital expenses effectively.
Understanding Subscriptions on iPhone
Before diving into the cancellation process, it’s important to understand how subscriptions work on the iPhone. When you subscribe to a service through an app downloaded from the App Store, the subscription is linked to your Apple ID. This centralized approach allows you to manage all your subscriptions in one place, rather than having to deal with each service provider individually. It’s a convenient system that also applies to subscriptions initiated through Apple’s own services, such as Apple Music or iCloud storage.
Step-by-Step Guide to Canceling Subscriptions
Canceling a subscription on your iPhone is a straightforward process. Follow these steps to manage your subscriptions effectively:
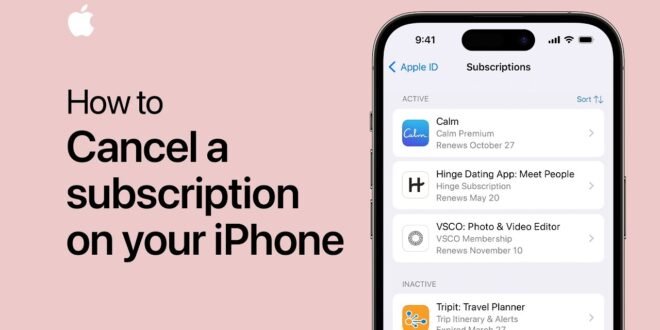
Accessing Your Apple ID Subscriptions Page
- Open Settings: Start by opening the Settings app on your iPhone. This app is typically located on your home screen.
- Tap Your Name: At the top of the Settings menu, you’ll see your name and profile picture. Tap on this to access your Apple ID settings.
- Select “Subscriptions”: Scroll down until you see the “Subscriptions” option and tap on it. This will take you to a page listing all your current and past subscriptions linked to your Apple ID.
Canceling an Active Subscription
- Find the Subscription: On the Subscriptions page, you’ll see a list of all your active and expired subscriptions. Find the subscription you want to cancel and tap on it.
- Cancel Subscription: After selecting the subscription, look for the “Cancel Subscription” option. This will usually be at the bottom of the page. Tap on it, and you may be asked to confirm your decision.
- Confirmation: Once you’ve confirmed your intention to cancel, Apple will process your request. You’ll typically receive a confirmation notice, either on the screen or via email.
Things to Keep in Mind
- Trial Periods: If you cancel a subscription during a free trial period, access to the subscription may end immediately, depending on the service provider’s policy.
- Refunds: Apple generally doesn’t issue refunds for subscription payments, so it’s a good idea to cancel a subscription well before the next billing cycle if you no longer wish to use the service.
- Access Duration: After canceling a subscription, you’ll often still have access to the service until the end of the current billing cycle.
Other Methods to Manage Subscriptions
While the above method is the most direct way to cancel subscriptions on an iPhone, there are other avenues you can explore:
Via the App Store
- Open the App Store: Launch the App Store on your iPhone.
- Access Your Account: Tap on your profile icon at the top right of the screen.
- Manage Subscriptions: Tap on “Subscriptions” to see your active and expired subscriptions, following the same steps as described above to cancel as needed.
Contacting the Service Provider Directly
In some cases, you might need to cancel a subscription directly with the service provider, especially if the subscription isn’t listed under your Apple ID. Visit the service provider’s website or contact their customer service for guidance on canceling.
Conclusion
Managing and canceling subscriptions on an iPhone is an essential skill in today’s digital world. By following the steps outlined in this guide, you can take control of your subscriptions, ensuring you only pay for the services you use and enjoy. Remember, staying proactive about your subscriptions can help you avoid unwanted charges and keep your digital spending in check. Whether you’re simplifying your digital life or just doing some financial housekeeping, knowing how to cancel subscriptions on your iPhone is a valuable tool in your tech-savvy toolkit.