Inspirescroll
Taking screenshots on a Mac is a fundamental skill that can greatly enhance your productivity and communication. Whether you’re capturing a moment of inspiration, documenting an issue, or simply wanting to share what’s on your screen, knowing how to do it efficiently is essential. This guide will walk you through the various methods of taking screenshots on a Mac, ensuring that you can capture exactly what you need, when you need it.
Understanding Mac’s Screenshot Capabilities
MacOS is equipped with powerful, built-in screenshot tools that offer a range of functionalities, from capturing the full screen to snipping a selected portion. These tools have evolved over time, becoming more intuitive and feature-rich, providing users with a seamless experience. Understanding these capabilities is the first step in leveraging them to their full potential.
Full-Screen Capture
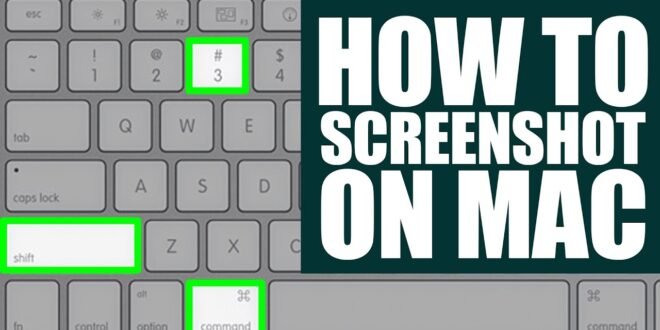
The most basic and commonly used screenshot function is capturing the entire screen. This is incredibly straightforward on a Mac. Simply press Shift + Command + 3 simultaneously, and your Mac will capture the entire screen, saving the screenshot as a file on your desktop by default. This method is perfect for when you need a comprehensive view of your entire screen.
Selection Capture
There are often times when you don’t need an image of your entire screen but rather just a specific area or window. Mac’s selection capture feature is perfect for this. By pressing Shift + Command + 4, your cursor turns into a crosshair, allowing you to click and drag to select precisely the area you want to capture. Upon releasing the mouse or trackpad button, the selected area is captured and saved. This method offers precision and flexibility, making it ideal for capturing specific information.
Window Capture
For those moments when you need to capture a single window without any background distractions, MacOS offers a simple solution. After initiating the selection capture with Shift + Command + 4, press the Spacebar. This changes the cursor to a camera icon, which you can then hover over the window you wish to capture. A click will save an image of the window, complete with its shadow, providing a clean and isolated image of the window.
Touch Bar Capture
For MacBook Pro users with a Touch Bar, capturing it is just as simple. Pressing Shift + Command + 6 will take a screenshot of what is currently displayed on your Touch Bar, allowing you to share or document your Touch Bar setup or notifications.
Screenshot Utility
Beyond keyboard shortcuts, MacOS Catalina and later versions include the Screenshot app, which is accessed by pressing Shift + Command + 5. This utility offers a user-friendly interface for all the screenshot functions mentioned above, along with additional options such as screen recording. It also allows you to choose where to save your screenshots, add a timer, and show or hide the mouse pointer in the capture.
Tips for Perfect Screenshots
Taking a screenshot might be simple, but there are tips and tricks to enhance the process and the outcome:
- Timed Screenshots: Using the Screenshot app, you can set a timer for your capture, giving you time to arrange your screen exactly how you want it before the screenshot is taken.
- Clipboard Saving: If you’d rather not clutter your desktop with screenshot files, you can save your screenshots directly to the clipboard by adding the Control key to any of the combinations above. For example, Control + Shift + Command + 4 will allow you to select an area and save the screenshot to the clipboard, ready to be pasted into any document or image editor.
- Editing Screenshots: Immediately after taking a screenshot, a thumbnail appears in the corner of your screen. Clicking on this thumbnail opens the screenshot in a quick-edit window, where you can annotate, crop, or share the screenshot without needing to open another app.
Advanced Screenshot Tools
For those who require more advanced features, third-party apps like Snagit or Lightshot offer extensive editing capabilities, preset dimensions, cloud storage integration, and more. These tools are particularly useful for professionals who need more than just the basic functionalities.
Conclusion
Understanding how to screenshot on a Mac is more than just a basic computer skill; it’s an essential part of navigating the digital world more efficiently. Whether it’s for work, education, or personal use, mastering the various methods and shortcuts can save you time and enhance your ability to communicate visually. With this comprehensive guide, you’re now equipped to capture anything from a fleeting moment to detailed visual instructions with ease and precision.
FAQs on How to Screenshot on Mac
1. Where do my screenshots go on a Mac?
By default, screenshots are saved to your desktop as PNG files. The file name will start with “Screen Shot” followed by the date and time the screenshot was taken. However, using the Screenshot app (Shift + Command + 5), you can change the default save location to documents, clipboard, or any folder of your choice.
2. Can I take a screenshot on a Mac without a keyboard?
Yes, you can use the Screenshot app by navigating to Applications > Utilities > Screenshot. Alternatively, you can use Touch Bar (if available) or Siri to take a screenshot by saying something like “Take a screenshot.”
3. How do I take a screenshot of a specific window with shadow?
After pressing Shift + Command + 4, hit the Spacebar to change the cursor to a camera icon, then hover over the window you want to capture. Clicking will take a screenshot of the window with its shadow. To capture without the shadow, hold down the Option key while you click.